Wednesday, March 28, 2012

The Icing on the Cookie

A few things to note:  Please excuse any typos in this post because the C button on the laptop is busted and I may not catch all the errors.

Tonight is the preschool open house.  It's sort of like a parent's night where the moms & dads walk around the classrooms and the kids get to show off their beautiful artwork.  They do artwork all year long, but there's a special emphasis leading up to Open House, complete with a classroom lock-down for the last 2 days so that everything is a surprise.

The other coolest part about Open House is cookies!  Parents are asked to contribute cookies, and being a baker, I like to do my own.  I decided on iced sugar cookies.  I love the Alton Brown sugar cookie recipe off the Food Network website.  But I didn't have a recipe for icing.

I found this one, which was going to be everything I wanted - a smooth, shiny finish and no egg whites.  I went ahead and mixed it up, but it was so thick, there was no way it would spread anywhere.

Here's my adaptation:

Sugar Cookie Icing

  • cups powdered sugar
  • 4+ teaspoons of milk
  • teaspoons light corn syrup
  • 1/2 teaspoon vanilla extract
  • food coloring

In a mixing bowl using an electric mixer (or stand mixer with whisk attachment) combine sugar, a few tablespoons of milk, add vanilla and corn syrup and keep mixing.  Keep adding milk, just a teaspoon at a time, while the mixer is going until you get the desired consistency.  Thicker for spreading, thinner for piping, etc.  Separate into small bowls and stir in desired coloring.  And you're ready to go!


I spread my frosting on with the back of a spoon.  I'm sure that piping on the frosting would look neater and more professional.  I used a little green sugar on the tops of the carrots.



And a little pink gel icing for the bunny faces.


They were a hit!

Monday, March 26, 2012

Egg-citing Craft Time (oh yeah)

Sorry about the title.  Skipping an egg related pun for an Easter craft would be a wasted opportunity.

With Easter right around the corner and a recent affection for Mod Podge I decided to give some eggs a whirl.


Now I guess you could use actual eggs to do this (draining the innerds first), but I decided to use craft eggs made from paper mache.  Again, I decided to dive into the old clothes bags to find some materials to cover the eggs - seeing as we have tons of funky and bright clothes from Sarah.

My first try was a bit of a bust, but I'll chalk it up to "learning".  I learned that I do need to go a little slower to minimize wrinkles and avoid accidentally cutting things too small.  I also learned that I should paint the eggs white before trying to apply the fabric.  The unpainted eggs are cardboard colored and the result without painting them first is sort of dark & drab rather than bright.


So step 1 is painting the eggs.  I used white acrylic craft paint and let them dry a bit.


Then I picked some old clothes in nice patterns that would work for eggs.

I cut out pieces wide enough to wrap around the egg at the widest point and long enough go end to end.  And I just started putting it on with Mod Podge.  I 'Podged up a smallish area, pressed on the fabric little by little.  With the round eggular shape, it was impossible to get it totally flat, but using scissors to slit down and overlapping flaps, I managed to avoid wrinkles.   Well, most wrinkles.


This step took quite a while because I let one side dry before starting the other side.

After the fabric was glued down all over, I went over the whole egg with a coat of Mod Podge.


The dry time for each layer was at least an hour.  It took a few days to get these done.


I did five eggs in different papers/fabrics.


What do you think?


DIY Show Off

Sunday, March 25, 2012

Check out my Can

As beautiful as last week was, this weekend has been equally dreary.  On one hand, I really missed the sun and was sad to have drizzle, clouds, and some fog, but on the other hand, it did give us some nice inside time.  Inside time = time to work on projects :)

I had a few projects in mind and a few already begun (you'll see that later this week), but in the meantime I was able to bang out something else.  Quick, easy & cheap!

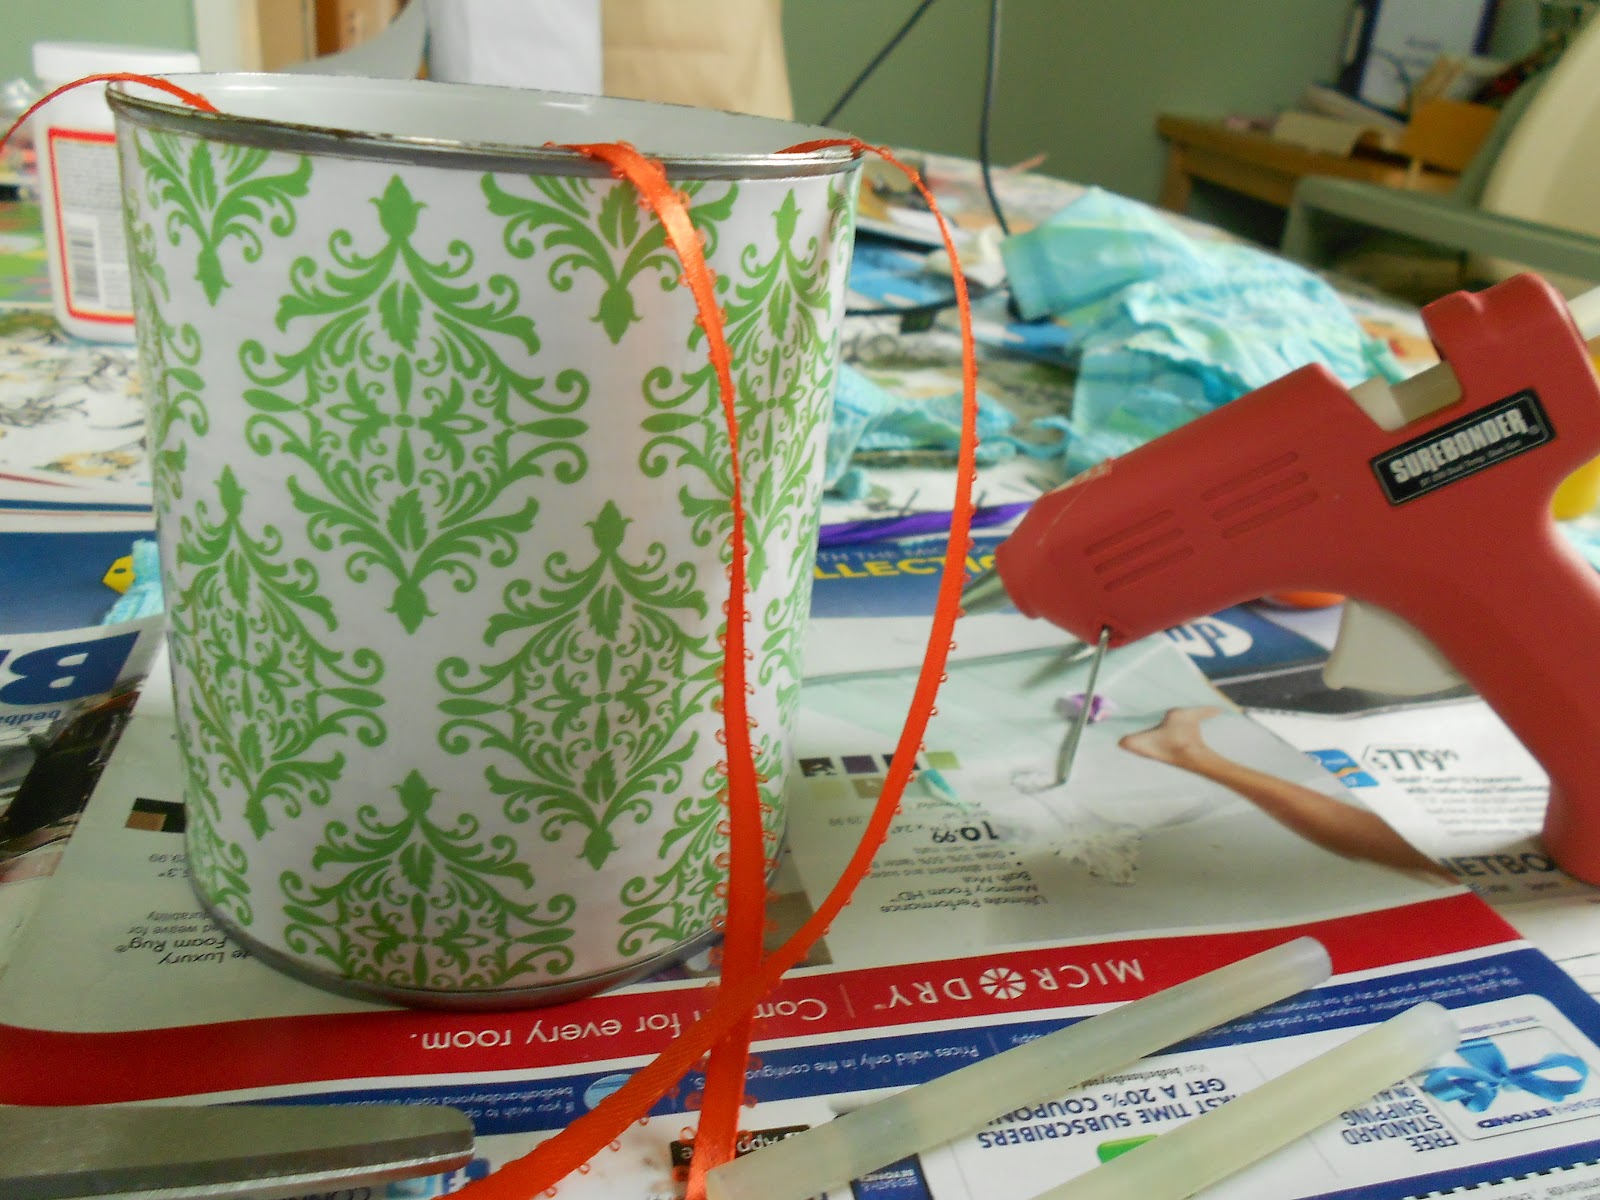
Yep, a can.  A Mod Podged pretty tin can.  So cheap, so easy, I'm almost embarrassed to consider this a tutorial of any kind, but whatever.  I figure if a thousand other bloggers can post about their Mod Podged cans, then so can I.

I had an empty can from making chicken enchiladas earlier this week.  So step one is removing the label and thoroughly washing and drying the can.

Then I painted the outside white. I'm not sure how necessary this was because some of the paint peeled off while I was applying the paper, but I really wanted bright colors, so I painted it with some white acrylic craft paint that I already had.  I didn't take a picture of this, but I'm sure you guys can probably guess what it looks like.

After leaving the paint to dry - maybe an hour or so? - I cut a piece of scrapbook paper to be the height of my can.  It took a few tries of trimming down so that the paper would fit nicely between the top and bottom ridges of the can.

I brushed on a thick-ish layer of Mod Podge to the can and applied the paper.  I had to adjust the paper a few times to get it straight, but it was fairly straight forward.  Because the can was bigger around than a 12" piece of scrapbook paper, I cut out a little strip of paper to bridge the gap.  No matter, it'll be in the back :).  Another layer of Mod Podge over the whole thing and I left it to dry.  This drying time took quite a while with the 'Podge under AND over the paper.


Wait, wait, wait...watched a few episodes of Lost, had a bowl of ice cream, walk the dog...

After it dried, I admired my work and put on a second coat of Mod Podge.  I'm not sure if needed it, but I like painting the stuff on, so it got a second coat.

Then, the next day I rooted through my bag of tricks and found some orange ribbon to finish it off.  It came from Grandma Connie's 90th birthday party (it was used to tie the bags of M&Ms closed).


Using my handy-dandy hot glue gun, I attached the ribbon all the way around the bottom and top edges of the can, covering up the exposed ridges.


I made sure that the ribbon ends met at the back - where the patch of paper is.

Using the excess ribbon, I tied a tiny bow and attached it to the front.


And that's it!


Budget breakdown:

  • Can - free
  • Ribbon - free (because I'm a scavenger)
  • Glue - free (had it)
  • Mod Podge - free (had it)
  • Paper - $0.59

Total:  $0.59!!!

And now I have this pretty little storage container that sits in my hall closet.  It's holding my brushes so that I can always find them.  And it makes me smile when I see it.  Even spaces behind closed doors can be pretty, right?


Linked Up:

The Shabby Nest

Thursday, March 22, 2012

Spring has Sprung!

(ok it's not in focus, but I can't turn back the clock and take this one again)

It's hard to talk about this week without mentioning the spectacular weather.  I mean, it's MARCH and it's over 70 degrees every day for a week.  Tomorrow is Friday and it's going to be near 80.  I certainly hope this won't lead to a sweltering summer, but seeing as there's not much I can do about it, I choose to enjoy the beautiful days we have now.  How?  OUTSIDE TIME!

Just like all kids, Chris & Sarah love playing outside.  Bubbles, dirt, riding toys, and sidewalk chalk.  It's all fun.  I feel like we need a swing set and/or a sandbox.  I'll update if we take the plunge.


I guess it's time to get prepped for Easter.  Time to do some spring cleaning & put out our ceramic bunnies.  You all have ceramic bunnies, right??  Easter related craft coming soon!!!!

Monday, March 19, 2012

Finally!!! A lamp refurb!!

I mentioned quite a few weeks back that I had been scouting projects around the house and decided that the floor lamp Chris broke (read more about that here) would be a great one to tackle.  And then last weekend I wrote the sad story of how we were progressing and meeting with some roadblocks (read here).  I'm pleased to say that I FINALLY have some success to report.

But before I delve into the lamp update, I'd like to give a little history on the lamp itself.  Long ago in the 1990s the floor lamp was purchased from Ikea to light up the back of the "Family Room" in my parents house.  I guess it was my house back then.  By the time Jason and I bought our house my parents had changed their place so much that they no longer needed this Ikea classic and it moved in with us.  It was awesome because we love free stuff.  Who doesn't?

Here it is:


A perfectly serviceable lamp, but not quite the look I was going for.  Most of our stuff is exceedingly neutral and I was starting to eye lamps with more presence (style/color) and I really wasn't feeling the super angled shade that came with it.  I've got a thing for drum shades lately.  So being the cheapskate that I am, I decided that rather than buying something new, I'd at least owe it to myself to try to update the one I had.

I hit up Ikea (more on that here) for a new lampshade.

I stopped in at Walmart for some sweet purply spray paint.  And since I didn't want a shiny finish and the color I picked was apparently only available in a gloss finish, I also snagged a clear satin top coat.  And on one sunny, warm, not too windy day I went to town.  First I prepped the lamp by bagging the cord & wrapping the socket.  Then I painted on a nice light coat of primer:


I let it dry and did one final coat of primer.  Then let that dry and started in on the purple.  The color took a while to complete.  I had a few spots that didn't look so great so they were sanded down and reprimed/painted.  In the end the purple color came out great.  To my surprise, I was really digging the shiny finish so I skipped out on the satin clear coat.

Now the annoying part....the lamp socket was busted.  Chris had knocked the lamp over 2-3 times and the shade broke and the plastic pieces holding it got cracked as well.  So out they went, but with Ikea lamps, you can't always just go to the hardware store for replacement parts.  We figured the best plan would be to harvest parts from other Ikea lamps we had around the house.  Turns out my bedside table lamp had exactly what we needed for the lamp -- a switch up at the top (not on the cord) and t

he ring to hold a shade.  So Jason disassembled my bedside table light (which I was considering replacing anyway) and put together the socket on the floor lamp.  TADA!!!


I'm pretty pleased with the project as a whole.  It would have been done long ago if not for the socket snafu and a few too-windy-to-spray-paint days.


And here's how the living room looks with the lamp in the corner.  Notice how most of the toys are stashed away - so this is how it looks after 9pm and before kids come downstairs in the morning. 


9/4/12 UPDATE:  Guess What!  My project was featured over at Power of Paint - pop over and check out what other cool projects there are :)

LinkWithin

Related Posts Plugin for WordPress, Blogger...