When you are the parent of a small child, whether that child is a peaceful cooperative angel or whether that child is some sort of mischievous imp, your kid won't be any less destructive in someone else's house than they are in your house.
1. Lockdown the bedroom. Pick a bedroom for the toddler carefully. We chose the smallest bedroom with one window. That means that worst case scenario, only one roman shade to pay for. I also took out the tv, both lamps, alarm clock, framed art over the bed, and turned the dresser so he couldn't open the drawers. It might also be a good choice to remove the dresser altogether as my kid tried his darndest to completely destroy it. Luckily I'm pretty sure it's not an antique handed down from French royalty or something.
2. Bring toys, small quiet ones, new ones are best. You leave your house and drive to your vacation spot and after you've unloaded the car and you're hot and sweaty and ready for your first umbrella drink on the deck, your kids are staring at you saying, "I'm bored". Yeah, been there, done that. Solution: "Hey, go check out this cool new thing!" If you present your toddler (and/or older kids) with something they haven't seen before, you'll probably get enough time to suck down half of a cool beverage before they get tired again. Kids need stuff to do and although you may be happy to watch birds or boats go by, this just won't cut it for them. Legos, rubber figurines, trucks, barbies, whatever floats your kids' boat, bring it. But don't bring anything big or you'll be annoyed that you have to do just as much cleanup on vacation as you did at home.
3. Don't forget that your kid has to eat! I know your rental said that the house was fully stocked, but face it, the realtor and homeowner may not realize that your mind includes sippy cups and plastic plates. It's no big deal to throw a few plates, bowls, cups and tiny silverware into a bag and bring it along. I went to Ikea and picked up a fresh stock of this stuff on the supercheap. I also grabbed a pack of Solo cups/tops/straws at Target for on-the-go beverages. Not a green solution, but very convenient.
4. Have food rules. Now I have fond memories of my kinda-grandmom having firm rules about food in the tv room at their vacation house. And when I was 12, I thought it was superstrict, but not having to vacuum goldfish out of the carpet and couches everyday is really nice. I may need to institute this rule at home because it really was nice not having cups and bowls all over the house.
5. If it's broken, then fix it. Properly! Face it, your kid might break something. It happens, a lot. If it happens on vacation, then you should consider whether you can fix it. Last year Chris ripped the upper rack of the fancy dishwasher and broke some plastic part. I ordered a new part and installed it myself for $36 (probably a lot cheaper than a local repair guy or reporting it to the realtor). This year Chris tried to destroy a dresser and I attempted to do a repair and it turned out bad. If you will be doing a repair, do some research on the internet or visit the hardware store to make sure you're using the right kind of glue, screws, etc. And that you have the proper tools. If something is broken and you aren't able to properly repair it, then be sure to tell the realtor. This is what security deposits are for.
6. Try to relax. Vacation is supposed to be a fun and happy time for everyone, but it's easy for things to get stressful for parents. If your kid seems to be living on donuts for breakfast and ketchup for dinner, just try to remember that this is but a week in their lives and that you can get back to normal when you're home. And remember, next year your toddler won't be a toddler anymore.
Oh and as a safety reminder - bring along some childproofing equipment (gates, cabinet locks, outlet covers, etc). When cleaning our place, my dad found that Chris had done this to a bunch of outlets behind the dining table:
Wednesday, August 1, 2012
Tuesday, July 24, 2012
Mod Podged Paper Towel Holder
Posted by
GP
Sometimes I just wander around my house looking at things I have and wondering if there's something I already have that could use some improvement to bring some style and color into my life or to see something I might otherwise throw away and see if I can rejuvenate it. It was one such stroll around the house that I spotted this little gem:
This thing was purchased at Walmart (I think) in about 2003 when Jason moved from Massachusetts into a tiny apartment in West Nowhere, PA. It made it to our apartment when we got married and then to our house when we bought it. It's not UN-attractive, but not terribly interesting. It's sort of a function over form sort of thing. I've actually been planning on getting a new one at some point, but until then I could at least make THIS one look more interesting.
A simple/quick makeover was in order - paint & Mod Podge. Very easy.
I started off by disassembling the whole thing and wiping it down to make sure it was nice and clean.
Then I did a few coats of white craft paint which I already had (costs about $1 per bottle at Michael's).
I made a plain paper template (to get the size right) and then traced it onto a piece of scrapboook paper (about $0.69).
After cutting out the circle, I was ready to get my Mod Podge on!
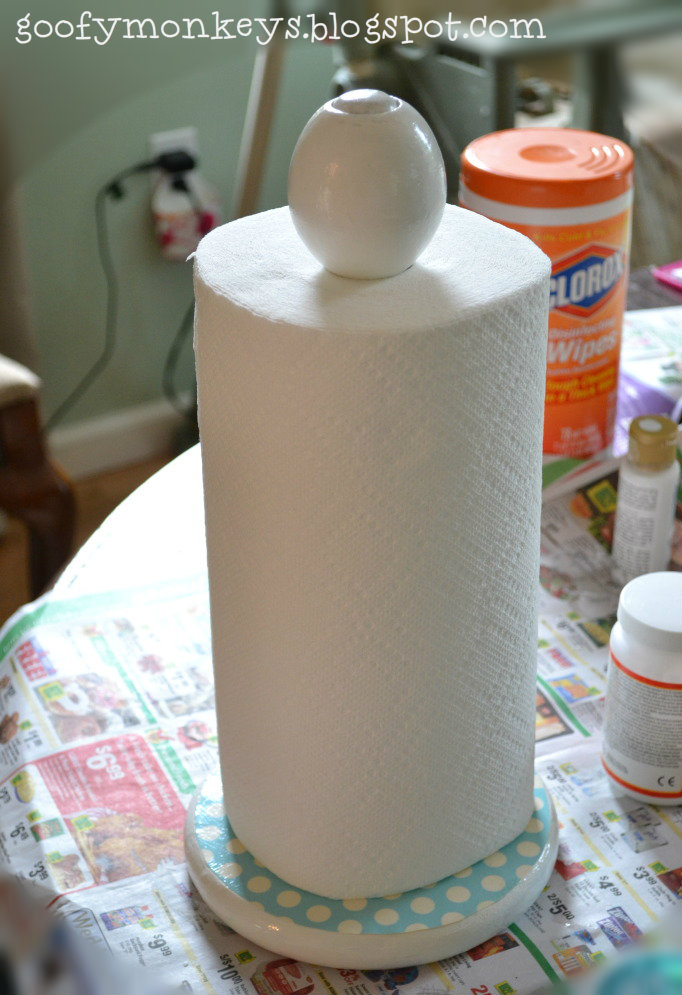
I applied a layer of Mod Podge then paid the circle on top. I added a topcoat of Mod Podge, trying to keep it smooth and even.
I followed up with a few coats of the Podge, allowing each coat to dry for about an hour.
Then BLAM! Done :)
I think it's a little snazzier than it used to be. I'm not sure this is a "forever" paper towel holder, but it's better than what it once was.
This thing was purchased at Walmart (I think) in about 2003 when Jason moved from Massachusetts into a tiny apartment in West Nowhere, PA. It made it to our apartment when we got married and then to our house when we bought it. It's not UN-attractive, but not terribly interesting. It's sort of a function over form sort of thing. I've actually been planning on getting a new one at some point, but until then I could at least make THIS one look more interesting.
A simple/quick makeover was in order - paint & Mod Podge. Very easy.
I started off by disassembling the whole thing and wiping it down to make sure it was nice and clean.
Then I did a few coats of white craft paint which I already had (costs about $1 per bottle at Michael's).
I made a plain paper template (to get the size right) and then traced it onto a piece of scrapboook paper (about $0.69).
After cutting out the circle, I was ready to get my Mod Podge on!
I applied a layer of Mod Podge then paid the circle on top. I added a topcoat of Mod Podge, trying to keep it smooth and even.
I followed up with a few coats of the Podge, allowing each coat to dry for about an hour.
Then BLAM! Done :)
I think it's a little snazzier than it used to be. I'm not sure this is a "forever" paper towel holder, but it's better than what it once was.
Tuesday, July 17, 2012
I FOUND IT!!!
Posted by
GP
Ok, so about 4 months ago (maybe longer, I don't know), something went missing. Something important. It was the wand extension and crevice tool for our vacuum. Now our vacuum does have on-board storage for all attachments, but because Chris is gross he kept pulling them off and licking them <gag>. So we had put the parts in another closet with a door he couldn't open.
Then I went to get them and they weren't there. Where were they? Did I move them? Did I put them somewhere else last time? OMG, we had just done a big purge, had I thrown them out accidentally? Did they get put in the black hole of our basement?? I looked and looked. Jason looked. High and low, places it should be (the closet) and places it shouldn't be (kids room, bathrooms, in the car, garage). These things were GONE.
Until today. I was feeding my addiction at Target (storage containers) and I picked up a few biggish bins from the dollar section (these 2 are $2.50 but still a good deal, in my opinion). I figured they could replace the cardboard boxes on the floor of the hall closet. So I went to put them in place and it was when I transferred stuff to the new bins that I found the tubes.
See, it's just like when Obi Wan Kenobi hands Luke Skywalker a lightsaber for the first time. Look at the majesty.
I was STUNNED! I called Jason at work. I posted to FB. I tweeted. Yeah, I'm that excited. I can now clean the crevices!!!!!!! And all because I found the stupid things in the closet exactly where they were supposed to be and where I had looked probably 6 times.
I suppose this really means I should do more decluttering.
Then I went to get them and they weren't there. Where were they? Did I move them? Did I put them somewhere else last time? OMG, we had just done a big purge, had I thrown them out accidentally? Did they get put in the black hole of our basement?? I looked and looked. Jason looked. High and low, places it should be (the closet) and places it shouldn't be (kids room, bathrooms, in the car, garage). These things were GONE.
Until today. I was feeding my addiction at Target (storage containers) and I picked up a few biggish bins from the dollar section (these 2 are $2.50 but still a good deal, in my opinion). I figured they could replace the cardboard boxes on the floor of the hall closet. So I went to put them in place and it was when I transferred stuff to the new bins that I found the tubes.
See, it's just like when Obi Wan Kenobi hands Luke Skywalker a lightsaber for the first time. Look at the majesty.
I was STUNNED! I called Jason at work. I posted to FB. I tweeted. Yeah, I'm that excited. I can now clean the crevices!!!!!!! And all because I found the stupid things in the closet exactly where they were supposed to be and where I had looked probably 6 times.
I suppose this really means I should do more decluttering.
Saturday, July 14, 2012
Big boy bed time!
Posted by
GP
In an unprecedented second trip to Ikea in a month (YAY!) we decided to just go ahead and get a bed for Chris. The main concern with keeping him in the crib was the potential for injury on an escape attempt. Just because he has escaped 475 million times without incident, that doesn't mean that he won't land wrong next time, right? The second benefit of getting him into a bed is that it's on "the list". So off we went to the epicenter for cool and modern Scandinavian home decor. A family trip, always fun.
We checked out twin beds and beds in the children's section. We hemmed and hawed over pros and cons of one vs. the other. And we went with a "junior" bed from the children's section. Here's a few reasons why:
There were a few cons to the junior bed, not the least of which is that due to the fact that it's not a common size, sheets are not available anywhere but Ikea. I figured this wasn't a huge issue as I can make some. As soon as I get a new cord for my sewing machine. (I know, it's been like 2 months. I should just stop procrastinating and order one.) For now we picked up 2 jersey knit sheets at Ikea.
The other major con is the fact that this bed will not last Chris until he leaves for college. We are totally ok with that! We had actually planned on upgrading Chris' bed regardless in a few years. See, Jason built Sarah's twin bed a few years back and we love it, so we figured he could just do it again (choosing.a different design). Whenever this is no longer needed, we'll just CL it.
Why not a toddler bed? A toddler bed is a great idea because they allow you to continue using the crib mattress and linens and many cribs convert into one. Mine didn't so I'd have to buy one. The annoying thing was that I wasn't able to find one locally (didn't try too hard) and the few people on CraigsList I contacted never wrote me back. And I wanted one NOW and not in the XYZ business days it would have taken WalMart to get one in.
Back to the story...we picked out the bed, mattress, a few sheets and came home. Jason disassembled the crib and stowed it away in the basement, I moved the dresser to the opposite side of the room to cover the cable outlet. Here's a little pic to explain what the heck I'm talking about.
Then Jason assembled the bed. It was your standard flat-pack Ikea assembly job with cartoon directions and little Allen wrenches.
Chris got a little practice in right before I got the sheets on:
After some additional purging of a few larger items from Sarah's side of the room it was bedtime!
I wish I could say that transitioning Chris to a "big boy bed" has been a painless and smooth process. Actually it's been pretty much a nightmare scenario where he gets out of bed 300 times before he finally falls asleep after 3 hours. **sigh**
Suggestions on how to do this better would be welcome!
We checked out twin beds and beds in the children's section. We hemmed and hawed over pros and cons of one vs. the other. And we went with a "junior" bed from the children's section. Here's a few reasons why:
- Chris is just 2 years old. We can get 2-3 years out of this junior bed. .
- He's currently sharing a bedroom with a big sister. For the immediate future, space in the room is an issue, a junior bed will fit better.
- The junior beds from the kid's section are very cute. The twin beds are geared toward adults/teens and not little kids.
There were a few cons to the junior bed, not the least of which is that due to the fact that it's not a common size, sheets are not available anywhere but Ikea. I figured this wasn't a huge issue as I can make some. As soon as I get a new cord for my sewing machine. (I know, it's been like 2 months. I should just stop procrastinating and order one.) For now we picked up 2 jersey knit sheets at Ikea.
The other major con is the fact that this bed will not last Chris until he leaves for college. We are totally ok with that! We had actually planned on upgrading Chris' bed regardless in a few years. See, Jason built Sarah's twin bed a few years back and we love it, so we figured he could just do it again (choosing.a different design). Whenever this is no longer needed, we'll just CL it.
Why not a toddler bed? A toddler bed is a great idea because they allow you to continue using the crib mattress and linens and many cribs convert into one. Mine didn't so I'd have to buy one. The annoying thing was that I wasn't able to find one locally (didn't try too hard) and the few people on CraigsList I contacted never wrote me back. And I wanted one NOW and not in the XYZ business days it would have taken WalMart to get one in.
Back to the story...we picked out the bed, mattress, a few sheets and came home. Jason disassembled the crib and stowed it away in the basement, I moved the dresser to the opposite side of the room to cover the cable outlet. Here's a little pic to explain what the heck I'm talking about.
Then Jason assembled the bed. It was your standard flat-pack Ikea assembly job with cartoon directions and little Allen wrenches.
Chris got a little practice in right before I got the sheets on:
After some additional purging of a few larger items from Sarah's side of the room it was bedtime!
Suggestions on how to do this better would be welcome!
Friday, July 13, 2012
Planning: Shifting Rooms
Posted by
GP
Until recently, we've been planning on having the basement be the next big project we tackle here at the house, but Chris' new trick of climbing out of bed has made it pretty obvious that moving Sarah to her own room is going to eclipse that in terms of importance. Poor kid wakes up to Chris in her bed and jumping on her.
So here's the breakdown of moving rooms for her:
1. Clean out downstairs room
So here's the breakdown of moving rooms for her:
1. Clean out downstairs room
- purge toys
- remove tv
- relocate "office" in the closet and the printer
- ditch rug
2. Make any repairs to wall & ceiling
3. Paint walls & ceiling (colors TBD)
4. Curtains and shades!
5. Desk solution (closet?)
6. Trim out closet door casing and put up a curtain
7. Move in!
After she's moved out of the 2nd floor bedroom, we'll need to do some work in there:
1. Big boy bed
2. Curtains & bedding
3. Repaint room
4. Closet repairs
So that's the plan for the rest of the summer! I think a few of these may be accomplished in July, but mostly in August. Then we can focus our energy on the basement in the Fall.
Subscribe to:
Posts (Atom)


.jpg)
.jpg)