Showing posts with label food. Show all posts
Wednesday, January 29, 2014
Recipe - Crustless Quiche
Posted by
GP
Wednesday, June 6, 2012
So Long May! And Birthday Fun!
Posted by
GP
Holy cow - where did May go? Is it me or was this May shorter than usual? Perhaps it's because I was busier or maybe the weather was better, but it just FLEW by. And actually the whole Spring disappeared on me - the calendar in the kitchen still says February. I'll have to put in June, but take the time to oooh and aaah over March, April, and May so they don't feel sad about being skipped.
May is over and it's time to jump straight into June which means it's time for Chris' Birthday! Yep, my big boy hit that milestone with grace and dignity and drool on his chin.
This year's birthday celebration was much smaller and relaxed (last year's party included Jason's family who came down for the weekend). The total guest list included the four of us, plus my parents and brother. It was relaxed and perfect.
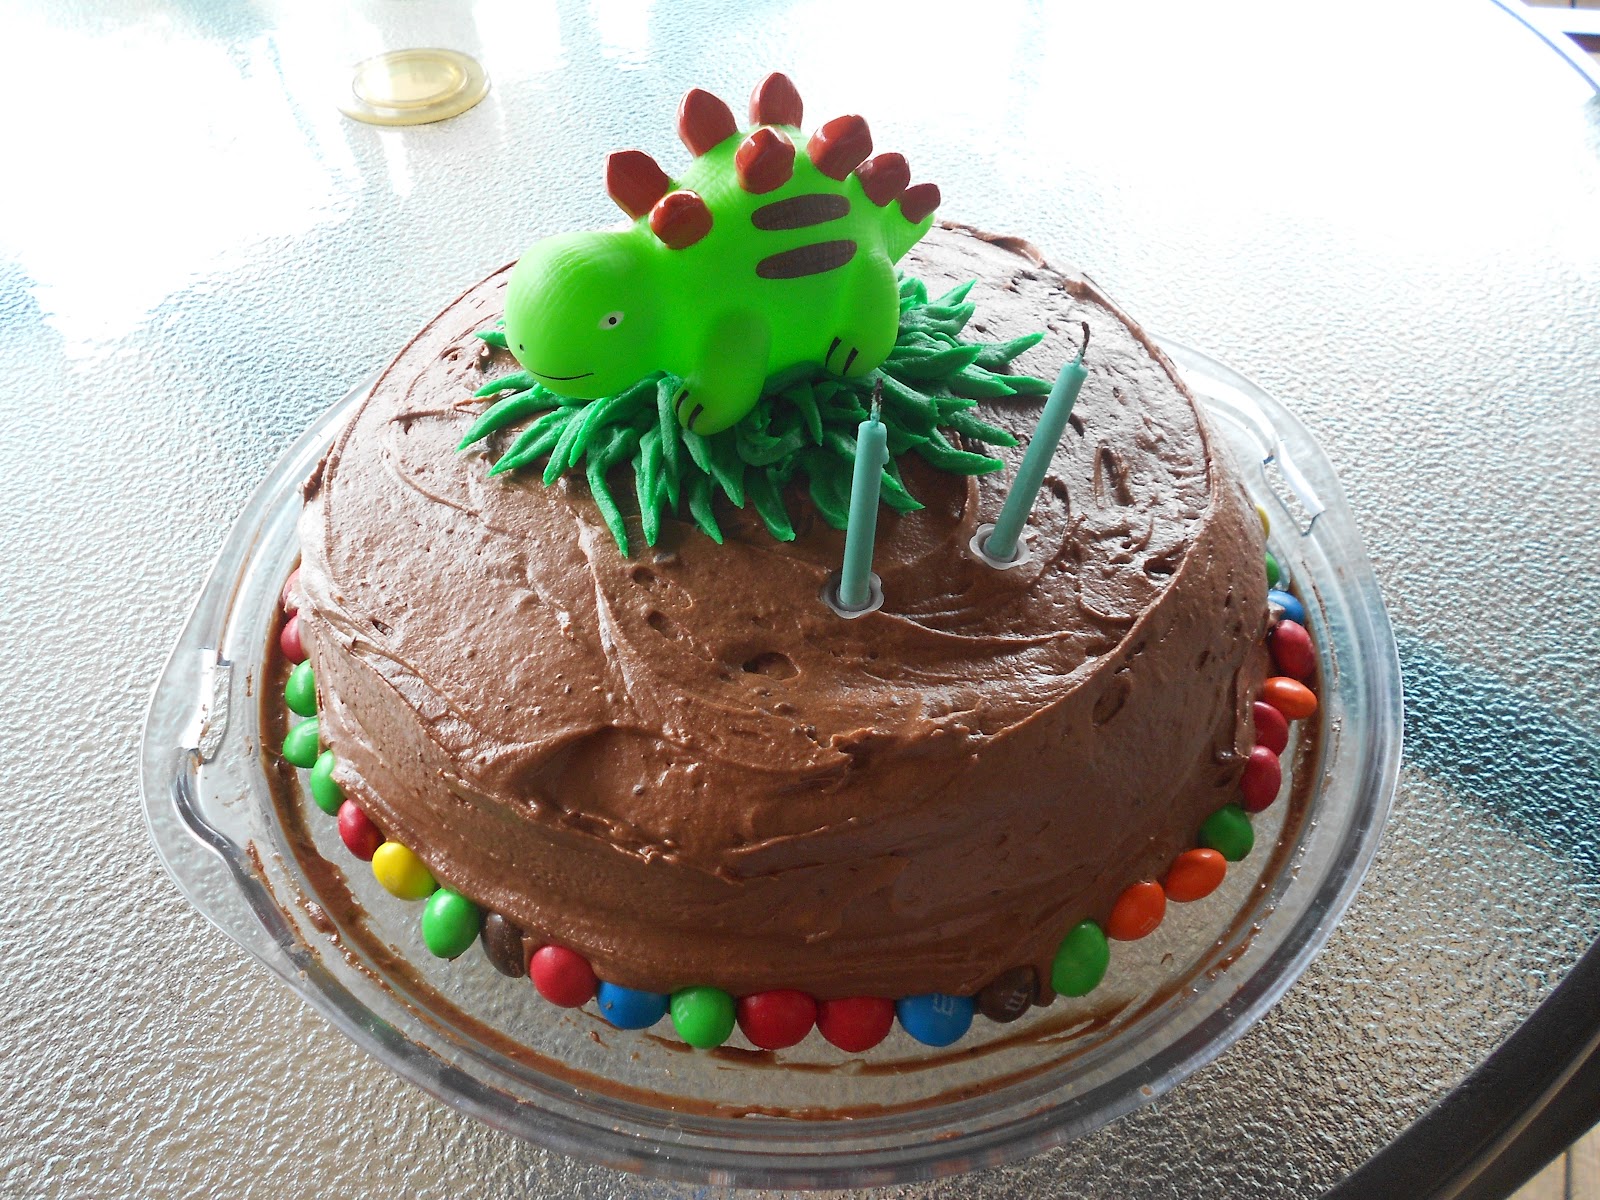
The theme for this year's small get-together was "general birthday with light dinosaur".
To avoid cooking we had hoagies. So good. These are from a local place called "Sleepy Hollow Delly". Their spelling amuses me.
Watermelon
Birthday Boy opted for PBJ instead of hoagie (he's Mr. Routine)
And we had cake
I like to use Cake Mix Doctor cake recipes and then a chocolate frosting recipe from Jason's mom.
Chris opened with presents, which he just ran over to and started unwrapping.
He got a few fun things from us (dinosaur train, big ball, sand mold for a truck) and from my parents (work bench) and Jason's parents (much needed clothes - the boy changes his outfit more often than the queen!).
I was a little bummed when I realized that I didn't get a good birthday-boy shot - but he's so all over the place that it's tough to get a good posed photo, especially with stuff like cake and presents around.
All in all, it was a nice day, great weather, good food, relaxed atmosphere and almost NO dishes to clean!
May is over and it's time to jump straight into June which means it's time for Chris' Birthday! Yep, my big boy hit that milestone with grace and dignity and drool on his chin.
This year's birthday celebration was much smaller and relaxed (last year's party included Jason's family who came down for the weekend). The total guest list included the four of us, plus my parents and brother. It was relaxed and perfect.
The theme for this year's small get-together was "general birthday with light dinosaur".
To avoid cooking we had hoagies. So good. These are from a local place called "Sleepy Hollow Delly". Their spelling amuses me.
Watermelon
Birthday Boy opted for PBJ instead of hoagie (he's Mr. Routine)
And we had cake
I like to use Cake Mix Doctor cake recipes and then a chocolate frosting recipe from Jason's mom.
Chris opened with presents, which he just ran over to and started unwrapping.
I was a little bummed when I realized that I didn't get a good birthday-boy shot - but he's so all over the place that it's tough to get a good posed photo, especially with stuff like cake and presents around.
All in all, it was a nice day, great weather, good food, relaxed atmosphere and almost NO dishes to clean!
Tuesday, May 8, 2012
Back Door Herb Box
Posted by
GP
I love garden fresh produce and one of the easiest things to grow is your own herbs. They'll grow all summer long and you'll save tons of money at the grocery store.
Think about the food you cook and what kinds of fresh herbs you buy at the store. If you buy fresh dill once every other year, then it's probably safe to leave that out of your plans, but if you love cilantro, then definitely include that! Herbs are available at your local garden center ready to go in pots and for my plan I chose cilantro, flat leaf parsley, and lemon thyme.
In past years I had used a small aluminum oval shaped bucket from Ikea as my planter, but my herbs were always too crowded. This year, I decided to take advantage of the raining on the back porch and I went with a window box.
I picked up a black wire window box planter with a liner at the Christmas Tree Shop. I snagged my plants at Home Depot.
Now a garden center might be a better place to choose a planter. There are several styles to choose from - flush mounted, mounted to the top, hanging baskets, etc. But the one from Christmas Tree Shop was about $8 so I just grabbed it when I saw it.
There was no hanging hardware for the planter I chose, so I decided to hang it with simple hooks screwed into the wood railing.
Because of the angled shape of the planter, it hangs sort of crooked. I placed a block of wood behind one side to even it out. A few screws will hold it in place.
Using a quality potting mix, I filled in the planter box.
Using scissors, I unpackaged each plant and tore through the biodegradable containers to help water drain. I put the pot in the planter and back-filled with more potting soil.
I hung the planter back on the hooks and watered.
Easy peasy!
A few things to note - I waited a few weeks after getting the plants before actually putting them in dirt. This is a bad idea. You risk accidentally killing your plants (mine have rebounded quite a bit in the few hours since I watered them). Also, it looks like the cilantro has a little frost damage. Oh and I think we may rethink how we hang this bad-boy because it's still slanted and it makes me sad.
Think about the food you cook and what kinds of fresh herbs you buy at the store. If you buy fresh dill once every other year, then it's probably safe to leave that out of your plans, but if you love cilantro, then definitely include that! Herbs are available at your local garden center ready to go in pots and for my plan I chose cilantro, flat leaf parsley, and lemon thyme.
In past years I had used a small aluminum oval shaped bucket from Ikea as my planter, but my herbs were always too crowded. This year, I decided to take advantage of the raining on the back porch and I went with a window box.
I picked up a black wire window box planter with a liner at the Christmas Tree Shop. I snagged my plants at Home Depot.
Now a garden center might be a better place to choose a planter. There are several styles to choose from - flush mounted, mounted to the top, hanging baskets, etc. But the one from Christmas Tree Shop was about $8 so I just grabbed it when I saw it.
There was no hanging hardware for the planter I chose, so I decided to hang it with simple hooks screwed into the wood railing.
Because of the angled shape of the planter, it hangs sort of crooked. I placed a block of wood behind one side to even it out. A few screws will hold it in place.
Using a quality potting mix, I filled in the planter box.
Using scissors, I unpackaged each plant and tore through the biodegradable containers to help water drain. I put the pot in the planter and back-filled with more potting soil.
I hung the planter back on the hooks and watered.
Easy peasy!
A few things to note - I waited a few weeks after getting the plants before actually putting them in dirt. This is a bad idea. You risk accidentally killing your plants (mine have rebounded quite a bit in the few hours since I watered them). Also, it looks like the cilantro has a little frost damage. Oh and I think we may rethink how we hang this bad-boy because it's still slanted and it makes me sad.
Wednesday, April 4, 2012
Parenting PSA: Nutella Fold-over Sandwiches
Posted by
GP
The Nutella fold-over sandwich is a brilliant and wonderful snack for kids & toddlers (without nut allergies, of course). We use 100% whole wheat bread so it's healthy. It's got protein in the Nutella, so it's filling. And it's chocolatey so the kids both LOVE it.
It should, however, be a closely supervised activity with the younger kids, and probably be confined to high-chair time.
Live and learn.
Wednesday, March 28, 2012
The Icing on the Cookie
Posted by
GP
A few things to note: Please excuse any typos in this post because the C button on the laptop is busted and I may not catch all the errors.
Tonight is the preschool open house. It's sort of like a parent's night where the moms & dads walk around the classrooms and the kids get to show off their beautiful artwork. They do artwork all year long, but there's a special emphasis leading up to Open House, complete with a classroom lock-down for the last 2 days so that everything is a surprise.
The other coolest part about Open House is cookies! Parents are asked to contribute cookies, and being a baker, I like to do my own. I decided on iced sugar cookies. I love the Alton Brown sugar cookie recipe off the Food Network website. But I didn't have a recipe for icing.
I found this one, which was going to be everything I wanted - a smooth, shiny finish and no egg whites. I went ahead and mixed it up, but it was so thick, there was no way it would spread anywhere.
Here's my adaptation:
Sugar Cookie Icing
In a mixing bowl using an electric mixer (or stand mixer with whisk attachment) combine sugar, a few tablespoons of milk, add vanilla and corn syrup and keep mixing. Keep adding milk, just a teaspoon at a time, while the mixer is going until you get the desired consistency. Thicker for spreading, thinner for piping, etc. Separate into small bowls and stir in desired coloring. And you're ready to go!
I spread my frosting on with the back of a spoon. I'm sure that piping on the frosting would look neater and more professional. I used a little green sugar on the tops of the carrots.

And a little pink gel icing for the bunny faces.
They were a hit!
Tonight is the preschool open house. It's sort of like a parent's night where the moms & dads walk around the classrooms and the kids get to show off their beautiful artwork. They do artwork all year long, but there's a special emphasis leading up to Open House, complete with a classroom lock-down for the last 2 days so that everything is a surprise.
The other coolest part about Open House is cookies! Parents are asked to contribute cookies, and being a baker, I like to do my own. I decided on iced sugar cookies. I love the Alton Brown sugar cookie recipe off the Food Network website. But I didn't have a recipe for icing.
I found this one, which was going to be everything I wanted - a smooth, shiny finish and no egg whites. I went ahead and mixed it up, but it was so thick, there was no way it would spread anywhere.
Here's my adaptation:
Sugar Cookie Icing
- 2 cups powdered sugar
- 4+ teaspoons of milk
- 4 teaspoons light corn syrup
- 1/2 teaspoon vanilla extract
- food coloring
In a mixing bowl using an electric mixer (or stand mixer with whisk attachment) combine sugar, a few tablespoons of milk, add vanilla and corn syrup and keep mixing. Keep adding milk, just a teaspoon at a time, while the mixer is going until you get the desired consistency. Thicker for spreading, thinner for piping, etc. Separate into small bowls and stir in desired coloring. And you're ready to go!
I spread my frosting on with the back of a spoon. I'm sure that piping on the frosting would look neater and more professional. I used a little green sugar on the tops of the carrots.
And a little pink gel icing for the bunny faces.
They were a hit!
Saturday, February 11, 2012
Pretzel Love
Posted by
GP
Sometimes necessity is the mother of....well trying something new. Today we needed a few things, but call me lazy but I really just didn't feel like going anywhere. And truth be told, most of the things we "needed" weren't really needs, just things we had run out of - snacks, sweets, etc. So I did some thinking and decided to make something sweet, savory and warm and delicious - SOFT PRETZELS! Sarah had tried some Auntie Anne's a few weeks ago and said they were awesome, so I figured I'd give it a shot.
I found this recipe on allrecipes.com, but I tweaked it just a bit and here it is below:
Ingredients
I found this recipe on allrecipes.com, but I tweaked it just a bit and here it is below:
Ingredients
- 4 teaspoons yeast
- 1 teaspoon white sugar
- 1 1/4 cups warm water (~110 degrees F)
- 4 cups all-purpose flour
- 1/2 cup white sugar
- 1 1/2 teaspoons salt
- 1 tablespoon vegetable oil
- 1/2 cup baking soda
- 4 cups hot water
melted butter
salt and/or cinnamon sugar
Directions
- In a small bowl, dissolve yeast and 1 teaspoon sugar in warm water. Let stand about 10 minutes to let the yeast get all frothy.
- Pour yeast mixture and oil into the bowl of your mixer and using the dough hook mix in the 1/2 cup of sugar and 4 cups of flour. This should form a nice dough. If it's dry add a bit of water, if it's sticky add some flour.
- Turn the dough out onto your counter and knead for 5 or so minutes. It will be stretchy and tough.
- Oil a bowl. Put kneaded dough into bowl and turn to coat with oil. Cover with plastic wrap and let rise for one hour. It'll be big!
- Preheat oven to 450 degrees F (230 degrees C). In a large bowl, dissolve baking soda in hot water.
- When risen, turn dough out onto a lightly floured surface and divide into 12 equal pieces. Roll each piece into a rope and twist into a pretzel shape. Once all of the dough is all shaped, dip each pretzel into the baking soda solution and place on a greased baking sheet. Sprinkle with kosher salt.
- Bake in preheated oven for 7 minutes, until browned.
- Remove baked pretzels and brush with melted butter. Brush a second time and sprinkle with either salt or cinnamon sugar.
These things were so delicious! Totally amazing. Oh and in honor of the season - we made hearts! <3
Note on photography (a term i use loosely to refer to the pics here) - I really need stop baking at night, daylight photos always turn out so much better.
Wednesday, December 14, 2011
Christmas Cookies: Sugar Cookies
Posted by
GP
It may surprise you that with all the cookies I love to make at Christmas, I don't think I've EVER made a straight up sugar cookie! How odd, right? This year I signed on for cookie duty for Sarah's preschool Christmas party, so I figured a cut-out sugar cookie decorated with frosting and sprinkles would be the way to go.
I used Alton Brown's sugar cookie recipe (highly recommended by tons of people). It was super simple to put together and the cookies came out perfect. Every single one.
For the class party we went with Christmas trees. I figured that giving each kid the same cookie would avoid any controversy over which shape might be a larger or smaller cookie. With the extra dough, we split between trees and snowmen.
The two most popular frostings I've seen are either Royal Icing or a butter cream, and because I was sure Sarah would do better with a knife than a pastry bag, we went with butter cream. I used the recipe found here.
She quickly wanted to switch to sprinkle duty so I schmeared the cookies and she sprinkled away.
Soon we had enough for the class, plus a few extras!
This time of year can be so crazy and busy and full of pressure and anxiety. It was such a nice, quiet, relaxing way to have a little mom and Sarah time.
We topped the night off with a reading of "How the Grinch Stole Christmas". A favorite!
Friday, December 2, 2011
Pizza Pizza!!
Posted by
GP
A few years back when Sarah was developing interest in what happened in the kitchen (rather than accepting that food magically appeared three times each day) I decided to show her how pizza was made. I scoured cookbooks (How to Cook Everything is a Bible for me) and websites for reviewed crust recipes and eventually formulated one of my own (based on Mark Bittman's recipe). We've gone on to having Pizza Friday as a nearly-weekly tradition with home made or pizzeria pizza.
Making pizza dough is easy. Really easy and not very time consuming. I usually do it with a messy kitchen, starting around 4:30 on Friday afternoon.
Pizza Dough
Put the flours, yeast, salt, EVOO into your mixer (or I suppose you could do this by hand) and fire that baby up using the dough hook.
Slowly add in the water. You may need more if a ball isn't forming, or if it seems sticky, add in some flour. You don't have to mix too much.
I like to turn it out on to the counter and knead it a little by hand (making me feel all homey and domestic) if it sticks to your hand, add a little flour. The more you mix and knead, the more the gluten in the dough is developed and the more you'll have stretchy dough to deal with. Now, if you want a stretchy type crust, then go for it, but it's harder to roll out the crust if it's super stretchy.
Take an oven-safe bowl and spray with some cooking spray, plop the ball of dough in there and give it a quick mist with the spray. Then cover with plastic wrap and stick it in the oven.
Did I mention that while the stuff is mixing together, i turn the oven on, let it heat up to about 100* F then I turn it off? The oven is a great place to let your dough rise. It's warm and not drafty. Perfect. If you don't know how hot your oven is, I suggest a handy-dandy oven thermometer. They're cheap and better than guessing.
While the dough is rising, I clean the kitchen. If you're like me then your kitchen almost ALWAYS has dishes in the sink and stuff in the dishwasher nobody wants to put away. So do it now. You'll feel better about yourself if you do.
At about 6:30 PM (roughly 2 hours later - but you can do it sooner if you're starving), take the dough out of the oven. It should look like this:
Pull out your pizza sheet. What? You don't have a baking sheet devoted to pizza? *Faint*. My darling husband and I have been married 7 years and eaten TONS of pizza (probably why my pants don't fit, but I digress). I use a plain old nonstick baking sheet. I had a pizza stone once but it broke....this thing works great anyway.
Use kitchen scissors to portion out the dough into 2 pieces (I make one a little bigger than the other). And form out your pie crust. Thick or thin, round or free-form, make it however YOU like it. I like thin :)
Top it (this one is for the kids so sauce, cheese and half pepperoni) and bake it at 500-550* for about 6-10 minutes.
The more toppings, the longer the bake time. If your oven is uneven, you'll need to give it a spin half way through baking.
The other one is BBQ chicken (my fave :)
ENJOY!
Making pizza dough is easy. Really easy and not very time consuming. I usually do it with a messy kitchen, starting around 4:30 on Friday afternoon.
Pizza Dough
- 2 Cups all-purpose flour
- 1 Cup whole wheat flour
- 1 tsp yeast
- 2 tsp kosher salt (or other large grained salt)
- 2 Tbsp extra virgin olive oil
- About 1 Cup of water
Put the flours, yeast, salt, EVOO into your mixer (or I suppose you could do this by hand) and fire that baby up using the dough hook.
Slowly add in the water. You may need more if a ball isn't forming, or if it seems sticky, add in some flour. You don't have to mix too much.
I like to turn it out on to the counter and knead it a little by hand (making me feel all homey and domestic) if it sticks to your hand, add a little flour. The more you mix and knead, the more the gluten in the dough is developed and the more you'll have stretchy dough to deal with. Now, if you want a stretchy type crust, then go for it, but it's harder to roll out the crust if it's super stretchy.
Take an oven-safe bowl and spray with some cooking spray, plop the ball of dough in there and give it a quick mist with the spray. Then cover with plastic wrap and stick it in the oven.
Did I mention that while the stuff is mixing together, i turn the oven on, let it heat up to about 100* F then I turn it off? The oven is a great place to let your dough rise. It's warm and not drafty. Perfect. If you don't know how hot your oven is, I suggest a handy-dandy oven thermometer. They're cheap and better than guessing.
While the dough is rising, I clean the kitchen. If you're like me then your kitchen almost ALWAYS has dishes in the sink and stuff in the dishwasher nobody wants to put away. So do it now. You'll feel better about yourself if you do.
At about 6:30 PM (roughly 2 hours later - but you can do it sooner if you're starving), take the dough out of the oven. It should look like this:
Pull out your pizza sheet. What? You don't have a baking sheet devoted to pizza? *Faint*. My darling husband and I have been married 7 years and eaten TONS of pizza (probably why my pants don't fit, but I digress). I use a plain old nonstick baking sheet. I had a pizza stone once but it broke....this thing works great anyway.
| See all the pizza lines? |
Use kitchen scissors to portion out the dough into 2 pieces (I make one a little bigger than the other). And form out your pie crust. Thick or thin, round or free-form, make it however YOU like it. I like thin :)
Top it (this one is for the kids so sauce, cheese and half pepperoni) and bake it at 500-550* for about 6-10 minutes.
The more toppings, the longer the bake time. If your oven is uneven, you'll need to give it a spin half way through baking.
The other one is BBQ chicken (my fave :)
ENJOY!
Thursday, November 17, 2011
Let's try this again....Lemon & Rosemary Chicken
Posted by
GP
About a month ago I was all excited to have thought up a twist on a recipe I love - Nigella Lawson's Slow Roasted Garlic & Lemon Chicken. I changed a few things and went for the Crock Pot instead of the oven. So after I had loaded everything up and headed out for the next few hours to class, I got a text message from Jason when I got there (~25 minutes into cooking) saying that the power went out (wah wah wah). And why wouldn't the power go out on a sunny October afternoon? Yeah, still don't know why that happened.
Sadly, we couldn't salvage the food...it had started cooking but not gotten hot enough to cook through and then sat cooling to room temp for about an hour and a half before the power came back on. Jason left it in the crock and it finally cooked through when the power came back, but I was too nervous to eat it so out it went (it smelled AMAZING) though.
Tonight we tried again...
Lemon & Rosemary Chicken
Sadly, we couldn't salvage the food...it had started cooking but not gotten hot enough to cook through and then sat cooling to room temp for about an hour and a half before the power came back on. Jason left it in the crock and it finally cooked through when the power came back, but I was too nervous to eat it so out it went (it smelled AMAZING) though.
Tonight we tried again...
Lemon & Rosemary Chicken
- 4 boneless skinless chicken breasts
- 1/2 cup chicken broth (I used the cubes of chicken stock that I made back here
- splash of dry vermouth or white wine
- coarse salt (kosher or sea salt work well)
- fresh ground pepper
- 3-4 cloves of garlic, peeled
- 1 lemon cut into slices
- fresh rosemary
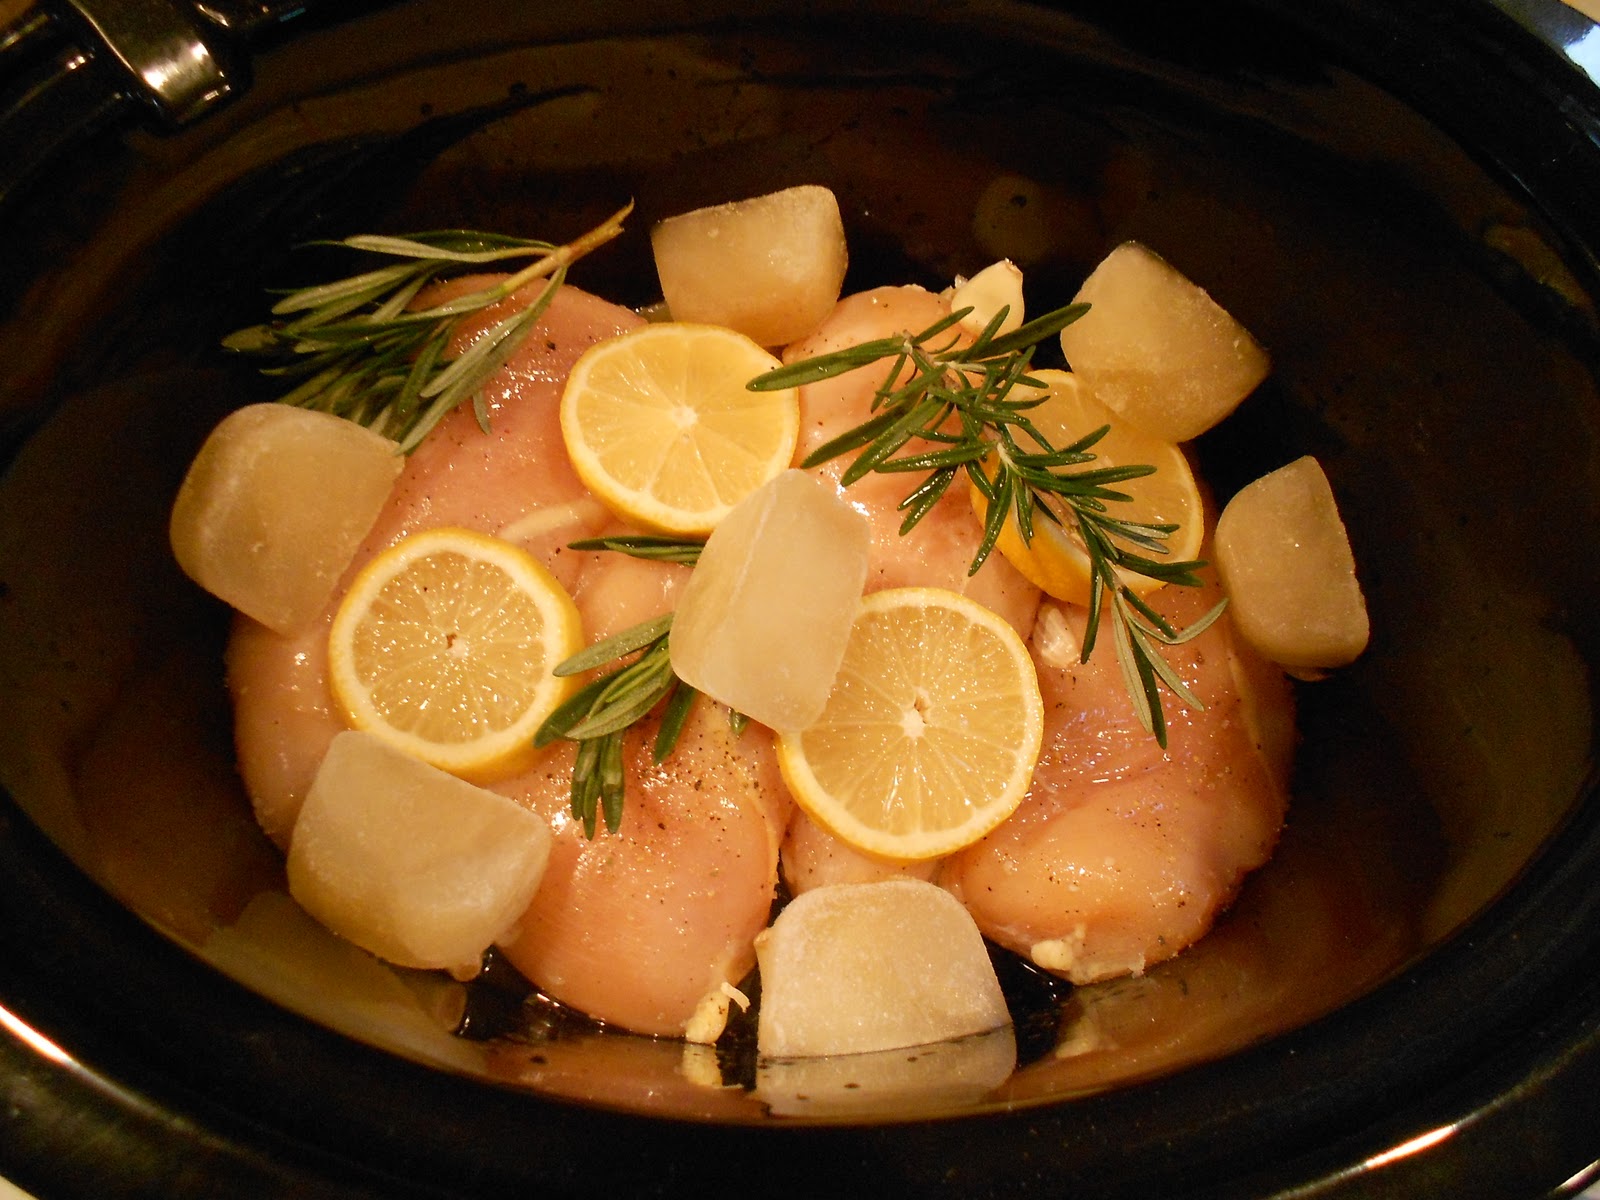
Load up the Crock Pot: Chicken on the bottom, salt & pepper, chicken broth, wine, then garlic, lemon and rosemary on top.
Fire up the CP on high and walk away...This should cook in about 3 hours, but times vary depending on your slow cooker, whether your chicken or broth was frozen, etc.
Sarah said the chicken was awesome. Chris ate it pretty well too. It'll make good leftovers for sandwiches, cut up on a salad, etc. Easy and good, I'll make it again.
Along with this we had Roasted Parmesan Green Beans from Skinnytaste. Oh my. They were DELICIOUS!
Now to think up another Crock Pot recipe to try...
Wednesday, November 2, 2011
Today is Chicken Stock Day!
Posted by
GP
So recently I made chicken enchiladas. They're awesome (thanks to skinnytaste.com for some great diet-friendly recipes). The up-side is that we have two meals (since only JP and I eat them) of delicious Mexican food. The down-side is that I am now out of chicken stock. I guess that's not really a down-side since I get to make more and I love making chicken stock :)
Well, love is a strong word, but trust me when I say that I like cooking big pots of stuff. There's something so satisfying about having a pot on the stove bubbling away and savory smells permeating the house.
Making your own chicken stock is easy, but a little time consuming. Mostly unattended cooking time though, so go for it!
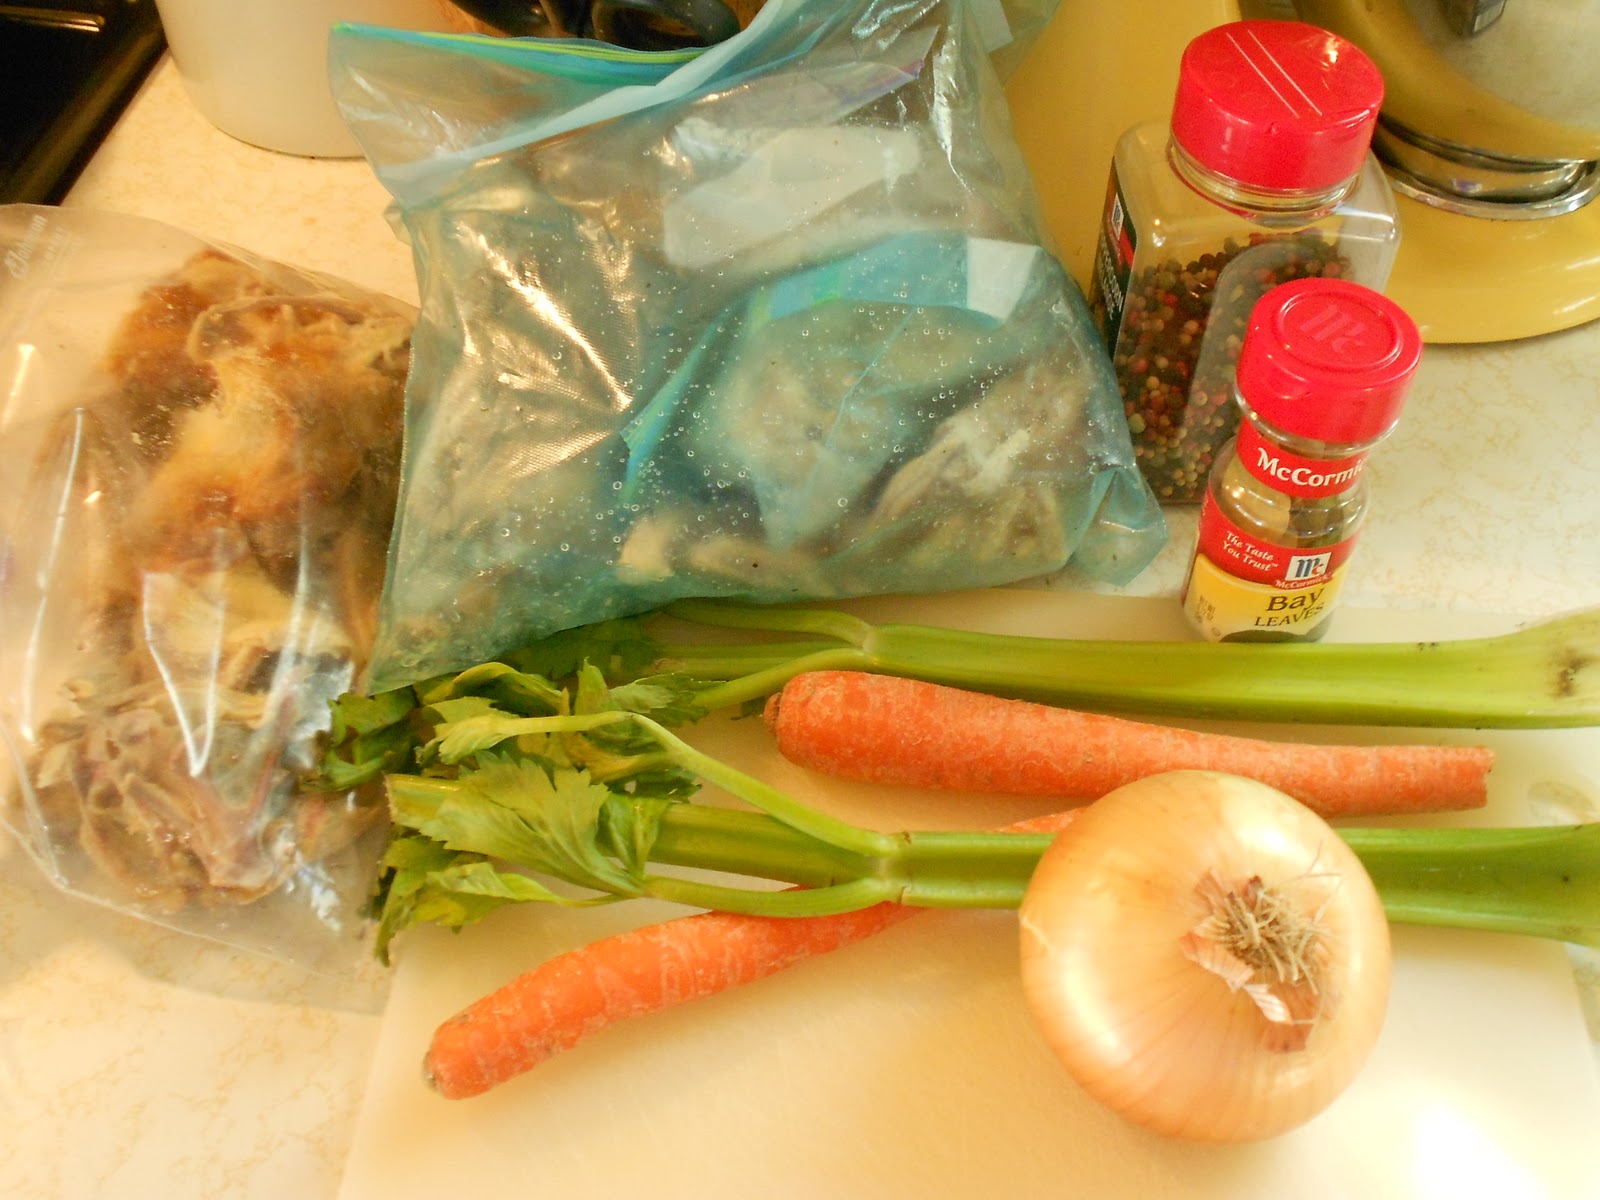
Here's what you'll need:
Toss chicken right on top, straight from the fridge or freezer.
Well, love is a strong word, but trust me when I say that I like cooking big pots of stuff. There's something so satisfying about having a pot on the stove bubbling away and savory smells permeating the house.
Making your own chicken stock is easy, but a little time consuming. Mostly unattended cooking time though, so go for it!
Here's what you'll need:
- leftover chicken parts - bones, skin, flecks of meat from chicken you've eaten recently. I usually take leftovers and throw them in a gallon freezer bag and keep them in the freezer until I have enough to make stock. 3-4 breasts, a chicken carcass, random parts...all will be good here
- veggies - a few whole carrots, a few ribs of celery, an onion quartered
- seasoning - a few cloves of garlic, a bay leaf, peppercorns, fresh thyme, parsley or dried if fresh isn't available
- tea "ball" - its a mesh ball used for brewing a pot of tea, or a giant one is for soup. I've heard some cooks use cheesecloth, but I just use the ball since I have one.
- skimmer - to remove the scuzz
- water
- big old stockpot
- Salt?? I usually leave salt out or use VERY little. The idea is that I'll be using this for cooking and most recipes have salt added, so I just salt to taste then.
Cover with water, a lot of water (about 6" above the top of the chicken) and fire it up!
Bring to a boil then lower to a simmer. Simmer for 4 hours skimming the scuzz (you'll know it when you see it) a few times each hour. Add hot tap water when the water level gets low.
When it's done, scoop out all the chicken pieces, bones, veggies, seasoning and discard. Strain the stock and put it in the fridge overnight.
In the morning, scoop out all the solidified fats.
I freeze the stock in ice cube trays and then pop them into a gallon zipper bag so I can just grab however much I need to use. I don't usually thaw the cubes before I use it, just toss them into the slow cooker, saucepan, skillet, etc.
And that's it! Was that so hard? Naaaah.
Friday, October 28, 2011
Apple Pie Pork Tenderloin
Posted by
GP
I cruised around the internet earlier in the week looking for recipe inspiration for a pork-related dinner that incorporated apples. This isn't quite the same as any recipe I found, but it's what I made and boy was it tasty!
Apple Pie Pork Tenderloin
Preheat oven to 400*. Place pork tenderloin in a baking dish. Season with salt & pepper.
In a separate bowl mix up apples, brown sugar, corn starch and cinnamon.
Pour apple mixture over pork, cover tightly with foil, and place in oven. Bake for ~25 minutes then remove from oven and spoon juicy apple juices over pork and return to oven for ~15 minutes.
Please use a meat thermometer for your pork as cooking times can vary depending on size/shape of your roast. Pork should be cooked to around 145-150* internally.
This tasted like pork chops & applesauce. Or a delicious sweet/savory meat/pie combo. YUM!
Apple Pie Pork Tenderloin
- 1 pork tenderloin
- 1 1/2 apples, diced smallish (I had Granny Smith, so I used those)
- 2 Tbsp brown sugar
- 1/2 tsp corn starch
- 1 tsp cinnamon
- a bit of water
- Salt & pepper
Preheat oven to 400*. Place pork tenderloin in a baking dish. Season with salt & pepper.
In a separate bowl mix up apples, brown sugar, corn starch and cinnamon.
Pour apple mixture over pork, cover tightly with foil, and place in oven. Bake for ~25 minutes then remove from oven and spoon juicy apple juices over pork and return to oven for ~15 minutes.
Please use a meat thermometer for your pork as cooking times can vary depending on size/shape of your roast. Pork should be cooked to around 145-150* internally.
This tasted like pork chops & applesauce. Or a delicious sweet/savory meat/pie combo. YUM!
Thursday, October 27, 2011
Ghost Cookies
Posted by
GP
As if Halloween didn't already provide piles of ooey-gooey, sweet, delicious treats I decided to whip up something in the spirit of Halloween. Whip these up in the evening and you'll have cookies by morning.
Ghost Cookies
Prep 2 cookie sheets with parchment and cooking spray. Preheat oven to 350*
Using an electric mixer, whip the egg whites until they form stiff peaks.
Beat in sugar, vanilla and salt.

Using piping bag and LARGE tip, pipe about 2 tablespoons into a ghost shapes about 1.5" apart. I didn't have a large tip, so I just used the large coupler.
Place the cookie sheets in the preheated oven, close the door and *turn the oven off*. Don't open the oven until morning and you'll have delicious perfect ghosts.
Using gel frosting (I used orange) add little dot eyes and a mouth to create that ghosty look.
Ghost Cookies
- 3 egg whites
- 1 C granulated sugar
- 1 tsp vanilla extract
- 1/2 tsp salt
Prep 2 cookie sheets with parchment and cooking spray. Preheat oven to 350*
Beat in sugar, vanilla and salt.
Using piping bag and LARGE tip, pipe about 2 tablespoons into a ghost shapes about 1.5" apart. I didn't have a large tip, so I just used the large coupler.
Place the cookie sheets in the preheated oven, close the door and *turn the oven off*. Don't open the oven until morning and you'll have delicious perfect ghosts.
Using gel frosting (I used orange) add little dot eyes and a mouth to create that ghosty look.
Happy Halloween!!
Thursday, September 29, 2011
Birthday Excitement
Posted by
GP
Late September is always a time of great excitement around here. It's the time when my big girl has her big day, and the very next day it's her dad's turn! Yep 2 birthdays in 2 days.
Now for my daughter, since she's a kid, there's a great deal of anticipation. And there's a whole lot of "Is tomorrow my birthday?" type questions, so when the day arrives I try very hard to make things happy and fun for her, but since her birthday falls on a weekday and her parties (one with school friends and a nice lunch with family) are both over the weekend, the actual birthday DAY can be a bit of a letdown, I think.
One of the best parts of her day was getting to take in a special birthday snack to school. And in the grand tradition of preschool snack restrictions, the school requests nutritious, nut and peanut free snacks. And no cupcakes, and no brownies. After a bit of thinking about what would actually be special we settled on Rice Crispy treats. Not too special, but she likes them but instead of using just the RK cereal, I subbed in 2 cups of Fruity Pebbles. OK, so I won't win any awards for brilliant recipe making, but she thought it was an AWESOME idea. I wish I took a picture. They're all gone now.
Next time I'll try Cocoa Krispies or perhaps some Apple Jacks.
Now for my daughter, since she's a kid, there's a great deal of anticipation. And there's a whole lot of "Is tomorrow my birthday?" type questions, so when the day arrives I try very hard to make things happy and fun for her, but since her birthday falls on a weekday and her parties (one with school friends and a nice lunch with family) are both over the weekend, the actual birthday DAY can be a bit of a letdown, I think.
One of the best parts of her day was getting to take in a special birthday snack to school. And in the grand tradition of preschool snack restrictions, the school requests nutritious, nut and peanut free snacks. And no cupcakes, and no brownies. After a bit of thinking about what would actually be special we settled on Rice Crispy treats. Not too special, but she likes them but instead of using just the RK cereal, I subbed in 2 cups of Fruity Pebbles. OK, so I won't win any awards for brilliant recipe making, but she thought it was an AWESOME idea. I wish I took a picture. They're all gone now.
Next time I'll try Cocoa Krispies or perhaps some Apple Jacks.
Subscribe to:
Posts (Atom)